
How to Use Raspberry Pi Cameras on Orange Pi Boards
Buy the Orange Pi 5 Camera Adapter ($15)
Connecting Raspberry Pi cameras to Orange Pi 5 boards has been a goal for a lot of people since launch, but the connectors simply do not match. Here is what is different, and how to get a Pi camera running on an Orange Pi 5 with the Tachyn Labs adapter.
Why Pi cameras do not work natively
- Raspberry Pi boards use a 15-pin or 22-pin FPC connector.
- The Orange Pi 5 series uses a 30-pin board-to-board mezzanine connector.
- Signal assignments (lane order, I2C, clock, power rails) differ.
- I2C on the Orange Pi is 1.8V; the Raspberry Pi uses 3.3V, so the adapter level-shifts it.
What you need
- Orange Pi 5, 5B, 5 Plus, 5 Max or 5 Pro.
- A Raspberry Pi ecosystem camera module. We have bench-tested the v1 (OV5647), v2 (IMX219), Camera Module 3 (IMX708) and Arducam IMX519 on Josh Riek Ubuntu and Armbian.
- The Orange Pi 5 Camera Adapter (Camera Adapter Board + Orange Pi 5 FPC Cable).
- A camera FPC: 22-pin to 22-pin, or 22-pin to 15-pin for 15-pin cameras (official Pi Camera v1, v2 and Camera Module 3), contacts facing up on the camera side. You supply it; the box includes the Camera Adapter Board + Orange Pi 5 FPC Cable.
- Joshua Riek’s Ubuntu 24.04 is the recommended OS for this setup guide.
The steps below use Josh Riek’s Ubuntu 24.04 image. Armbian also works for cameras, and current Armbian images include native IMX708 driver support, but overlay paths differ by board and image; follow the relevant Armbian documentation and check the Compatibility page for image-specific details. Note: we do not claim the HQ camera (IMX477) as tested — it is electrical only.
Step 1: Connect the hardware
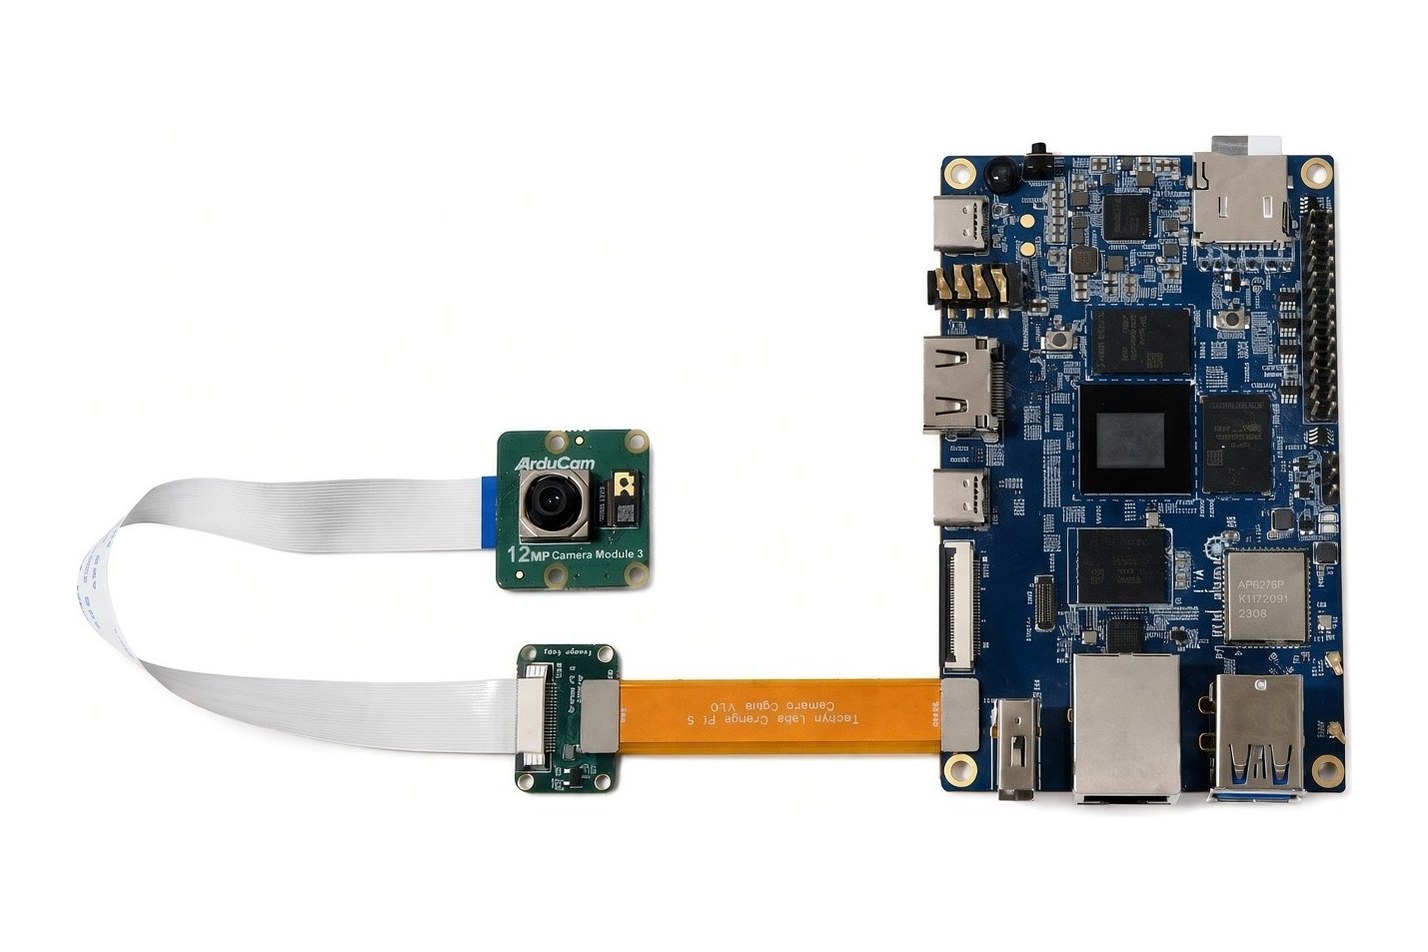
- Power off the Orange Pi before connecting anything.
- Connect the included adapter cable from the Orange Pi CSI connector to the Tachyn Labs adapter board.
- Attach the Pi camera to the adapter with a 22-to-22 or 22-to-15 pin camera cable, depending on your camera, exposed contacts facing up.
- Check orientation and seating — both ends fully inserted and latched. Pin 1 is top-right of the adapter, pin 22 top-left.
- Power on the Orange Pi.
Step 2: Camera engine and overlays (Joshua Riek Ubuntu)
Install the Rockchip camera engine and enable the 3A service:
sudo apt install camera-engine-rkaiq
sudo systemctl enable rkaiq_3A
Then edit /etc/default/u-boot and set the overlay for your sensor:
U_BOOT_FDT_OVERLAYS="device-tree/rockchip/overlay/orangepi-5-ov5647-c1.dtbo"
For two cameras, list both overlays separated by a space. Then run sudo u-boot-update and reboot.
Step 3: Test the camera (Joshua Riek Ubuntu)
A quick GStreamer preview confirms the link. Depending on how many cameras are attached, the video nodes differ (for example /dev/video11 for one camera, /dev/video22 and /dev/video31 for two):
gst-launch-1.0 v4l2src device=/dev/video11 io-mode=4 ! video/x-raw,format=NV12,width=720,height=576,framerate=15/1 ! xvimagesink
You should get one preview window per connected camera. A black feed usually means the cable is not seated correctly or there is no valid rkaiq tuning file for that sensor.
Step 4: Resolution, frame rate and exposure (Joshua Riek Ubuntu)
List the formats your sensor advertises, stop the 3A server, set the format, then restart it:
media-ctl -d /dev/media0 -p
sudo systemctl stop rkaiq_3A
media-ctl -d /dev/media0 --set-v4l2 '"m01_f_ov13855 2-0036":0[fmt:SBGGR10_1X10/4224x3136]'
sudo systemctl start rkaiq_3A
For manual exposure and gain, keep the 3A server stopped and use v4l2-ctl.
Compatibility notes
- Camera Module v1 (OV5647) — tested on Armbian and Josh Riek Ubuntu.
- Camera Module v2 (IMX219) — tested on Armbian and Josh Riek Ubuntu.
- Camera Module v3 (IMX708) — native driver support on current Armbian; tested on Armbian and Josh Riek Ubuntu. Other distros remain OS/overlay dependent.
- Arducam IMX519 — tested on Armbian and Josh Riek Ubuntu.
- HQ camera (IMX477) — electrical only. We do not claim it as tested.
Full status table: Compatibility.
Use at your own risk
This is a hobbyist and experimental setup. Always verify connections before powering on — a misaligned FPC cable can short power rails or data lanes.
Get the Orange Pi 5 Camera Adapter — $15
For a quick sensor and connector decision, see the Orange Pi 5 camera options comparison before choosing a native module or Raspberry Pi camera adapter.